Princess cake – or Prinsesstårta – is a traditional Swedish cake, now very popular in the United States and (amazingly) available by the slice in IKEA cafeterias! The recipe first appeared in the Princesses Cookbook by Jenny Åkerström in the 1930s – she was the tutor for the daughters of Prince Carl, Duke of Västergötland – and it got its name because the princesses were very fond of the cake.
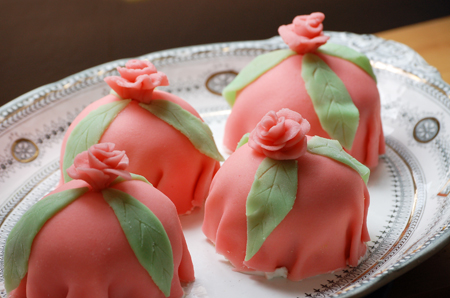
Traditionally, the cakes are covered with green marzipan and then decorated with bits of pink marzipan. Why green and pink? Not sure, but that is how they are!
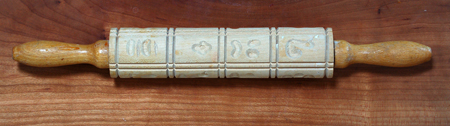
I encountered my fist princess cake at Ilsa’s Konditerei – a wonderful German bakery, pastry shop and restaurant (they had the most amazing Monte Cristo!) in Tucson. Sadly, Ilsa retired only weeks after Mark and I moved to Tucson but we enjoyed her food and warm welcome for the weeks that we had. Through the miracle of making friends, I managed to start my baking in Tucson with one of Ilsa’s two springerle rolling pins, along with her recipe. Maybe I will post that as we near the holidays… Here is a picture of the rolling pin:
My friend Barbara and I gathered last weekend to make mini princess cakes to celebrate a dear friend’s 89th birthday. We had a lot of fun making them, reversing the pink and green in order to suit our friend’s tastes. (She loves pink!) And, instead of decorating them to look like crowns, we simple opted for roses and leaves. She loved the cakes – we all did! (Even Mark who is not a big dessert fan!)
And the most fun of all? We discovered how easy they are to make (but time-consuming!), which means they will get made more often. I even have a Swedish friend for whom I could make them, although I will just need to figure out how to make it gluten-free for her…
Njut!
– David
Prinsesstårta
4 eggs, separated
4 ounces superfine (caster) sugar
1/4 teaspoon salt
1 1/4 cups flour
1/4 teaspoon baking powder
1 1/2 ounces butter, metled and cooled
cream filling (recipe follows)
whipped cream (recipe follows)
simple syrup (recipe follows)
1/3 cup seedless raspberry jam
2 7-ounce tubes marzipan
red and green food coloring
Generously butter 6 ramekins (1 cup) and then line the bottoms with a disc of parchment paper; butter the parchment, as well. Set aside. Preheat the oven to 350ºF.
Using a hand-held mixer, beat the egg yolks until they are pale in color and thickened. In the bowl of a stand mixer using the whisk attachment, beat the egg whites until soft peaks form then – still beating – add the sugar slowly and beat until stiff. Lighten the yolk mixture with about 1/3 of the beaten whites, then gently fold in the remaining whites until no streaks are visible.
Sift together the flour and baking powder. Sifting is key here – it helps to incorporate the flour with no lumps. Gently fold the sifted flour mixture into the egg mixture in 3 additions. Gently stir in butter and divide batter among the 6 prepared ramekins. Bake 22-25 minutes, or until a tester comes out clean. Let cool on a rack for 10 minutes, then loosen the sides with a tin spatula and torn cakes out onto the rack.
While cakes are baking, color and roll the marzipan. Take 10.5 ounces of marzipan (1 1/2 tubes) and put them in a large, sturdy resealable plastic bag. Knead briefly, then add 5 drops red food coloring. Knead the coloring into the marzipan until it is even and no streaks of color occur. Repeat with the remaining 3.5 ounces in a smaller bag with 1 to 2 drops green food coloring. (You can reverse the colors for a more traditional cake, or mix them up to make yours match a theme.)
Using confectioner’s sugar, “flour” your dough board and rolling pin. Roll out the pink marzipan to 1/12-inch thick. Using a template, cut out six 6-inch circles and stack them using waxed paper between each later. You will need to pull together your scraps, re-knead and re-roll in order to get the 6 circles. Knead together any remaining scraps to make roses for the final decoration. Place the circles and little pink scraps in the plastic bag you used for kneading, seal and set aside. Leave green marzipan in its bag for now; it will get rolled at the end.
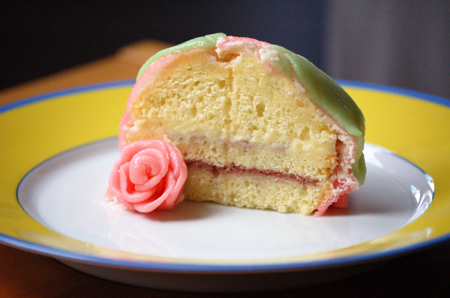
When cakes are cool, slice each one horizontally into three layers using a serrated knife. Line up the cake layers: bottom, middle, top. Brush all three layers liberally with the simple syrup, then spread raspberry jam on the bottom layer, and stack the middle layer on top. Add a thick slather of pastry cream on the middle layer and then add the top layer. Once all cakes are stacked, frost each liberally on the sides and top (with extra on the top) with whipped cream.
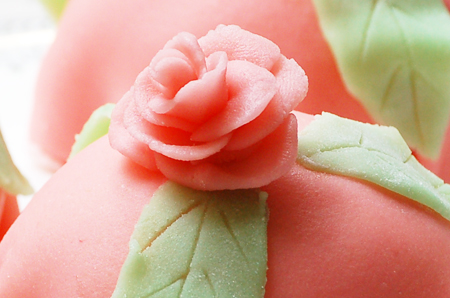
Place a disc of marzipan on each cake and gently mold around the cakes. Chill. Divide green marzipan into six equal pieces and make 6 sets of decorations – leaves, diamonds, long strips, or whatever. Make 6 roses out of remaining pink scraps. Add the decorations to the cakes, using a little water or egg white to help them adhere, if necessary. Refrigerate the cakes, covered, until ready to serve.
Makes six mini Prinsesstårtas, serving 12.
Pastry Cream
1 cup milk
1 teaspoon
vanilla extract
1 egg
2 1/2
tablespoons cornstarch
1/3 cup
sugar
Pinch salt
Bring the
milk and vanilla to a simmer in a medium saucepan. Whisk together the egg,
cornstarch, sugar, and salt in a bowl until smooth. Add half of the milk into
the bowl containing the eggs, whisking constantly, then return the mixture to
the saucepan containing the remaining milk, whisking over moderate heat.
Continue whisking until the mixture is thickened and begins to simmer. Allow
cream filling to simmer, whisking for an additional minute. Do NOT let it get
too thick! Transfer into another bowl, cover and let cool completely. Before
using, whisk in a large dollop of the whipped cream (recipe follows) to lighten
and loosen the pastry cream.
Whipped Cream
1 cup heavy
whipping cream
3
tablespoons sugar
1/2 teaspoon vanilla extract
Place all
ingredients in the bowl of a stand mixer fitted with the whisk attachment.
Whisk at high speed until cream is very thick. Refrigerate until ready to use.
Simple Syrup
1/2 cup
water
1/2 cup
sugar
1/2 teaspoon
almond extract (or flavoring of choice)
Bring all
ingredients to a boil in a small saucepan and boil for 30 seconds. Remove from
the heat and let cool. Leave at room temperature until ready to use.


Magda
July 23, 2011 at 5:39 pmDavid these look soooo sweet! I think I have tasted them once at Ikea but I'm not sure.
Your photographs are wonderful as well!
Did you make the small roses yourself?
Cocoa & Lavender
July 23, 2011 at 5:53 pmOddly, these weren't all that sweet, which is why Mark liked them. The ones at Ikea are definitely sweeter.
Yes, we made the roses. The ones in the photos are mine; Barb and I had different techniques. I made each petal (9 per rose) and Barb made one long flat piece and rolled it. Both looked great and took about the same time.
Tulika
July 23, 2011 at 6:50 pmThese look absolutely amazing, and wow– the roses are so detailed! Really love this!!
Cocoa & Lavender
July 23, 2011 at 7:04 pmThanks, Tulika! Marzipan is so much fun to play with – like Play-doh for adults with a taste palette!
Anonymous
July 23, 2011 at 11:40 pmThese are adorable, cute, and dainty, which is something I love about desserts.!!! Fab work on the fondant too!
Cocoa & Lavender
July 24, 2011 at 3:12 pmElle Marie – thanks for your comments! These are such perfect little desserts – and just the right size to share with someone special. I found they were even better after a day or two in the fridge. Playing with the marzipan was huge fun. Makes me want to make marzipan fruits for holiday gifts, although I will need some powdered food colorings to get the right shadings….
Anonymous
July 25, 2011 at 3:06 pmAmazing!!! I too love pink and am in awe of your flower and cake making abilities!! You are fearless in the kitchen my friend. Thank you for sharing these wonderful little bits of AMA-zing! Danette
Cocoa & Lavender
July 26, 2011 at 1:31 pmThanks, Danette! They are fun to make – you should try them!
My Little Expat Kitchen
July 28, 2011 at 12:06 pmI meant sweet as in cute 🙂
Cocoa & Lavender
July 28, 2011 at 1:09 pmWell, sweet does work in both cases! 🙂
Susan Manfull
August 1, 2011 at 3:02 pmThese look so professional…but we will try our best to make them look pretty when we make ours this week! One question or confirmation–the ramekins are 8-oz size? I only have 4-oz ramekins–I think those will work for smaller versions….right?
Cocoa & Lavender
August 1, 2011 at 3:09 pmYes, Susan, I am sure they will work, but you will get more than 6 and you will need to watch the baking time. Also, your marzipan circles will be smaller, too! Bonne chance! Bises, David
Colette (Coco)
September 24, 2012 at 9:40 pmThese are gorgeous li'l gems!
Cocoa & Lavender
September 25, 2012 at 1:57 pmThanks, Colette! They were really tasty, too!