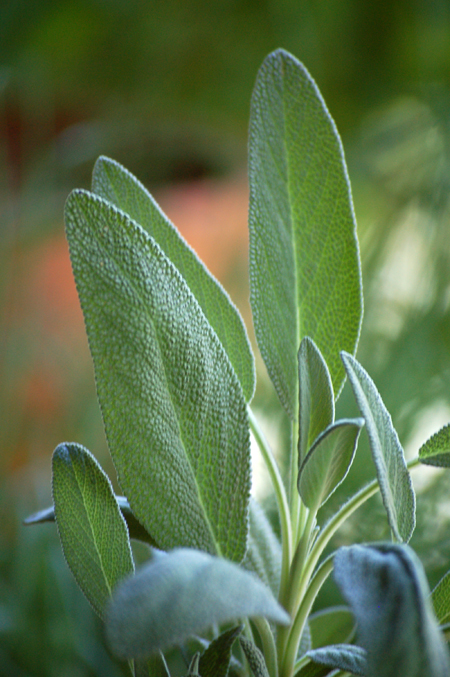
One: too much sage can make your dinner bitter. Follow the recipe and trust the chef. One time, we thought “more is better” and regretted it.
Two: whenever you can, make fresh pasta for dinner. We do, and have never regretted it. There is nothing like it, and making a party of it by doing it with friends and family is fun.
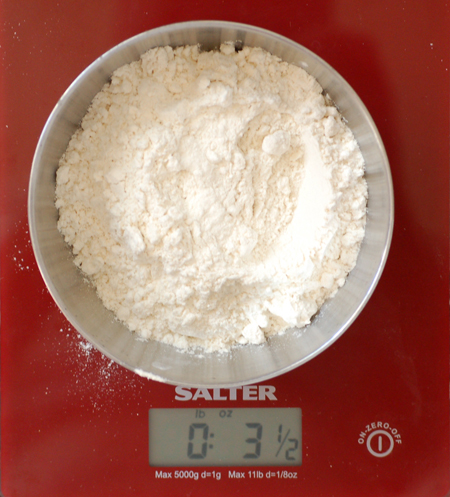 |
| I like this scale because you can change it from ounces to grams. |
Three: when making today’s recipe, use a scale to measure your flour!
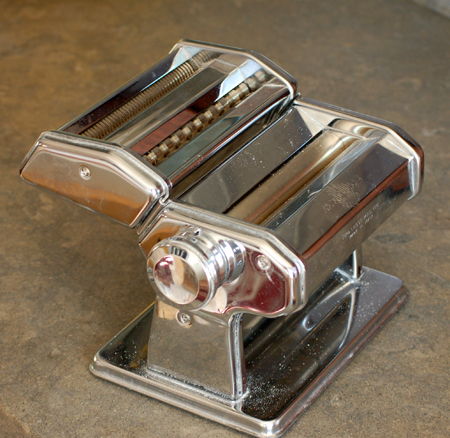
Four: if you don’t have a hand-crank pasta machine (I like Atlas brand), you should get one. They are easy to care for and make weeknight homemade pasta a reality instead of a dream.
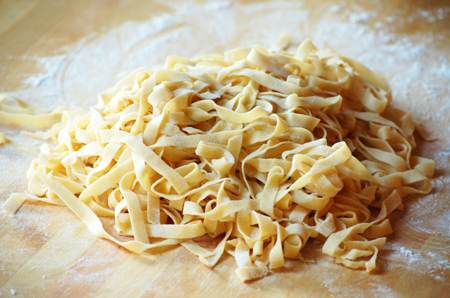
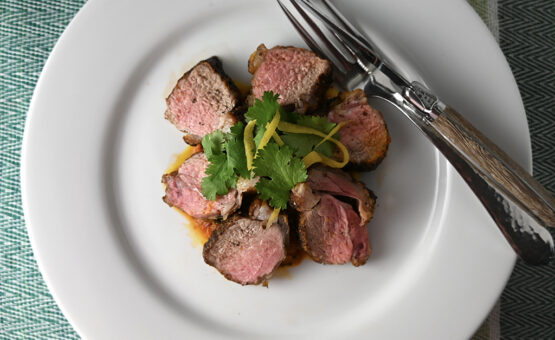
Today’s recipe is homemade pasta with butter and sage sauce – tagliatelle burro e salvia. We have very much enjoyed this in Italy, and I know you will too – simplicity at its best. And the pasta making doesn’t have to be a messy nightmare.
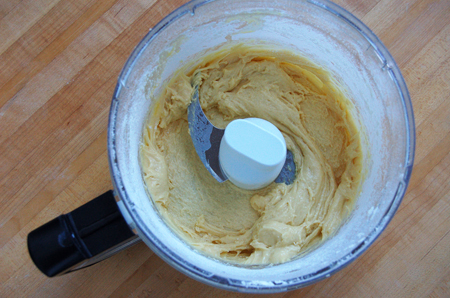
I am going to walk you through a food processor recipe for pasta dough step by step. It is very unusual, but takes only a few minutes, and really works! (The full recipe follows.) Place half the flour and the eggs in the bowl of the processor fitted with the steel blade. Pulse a couple of times to distribute the egg, then run the processor for about 45 seconds. Timing will vary depending on your processor; watch the dough carefully – as you process it, it will creep toward the blade shaft. Once it gets to the shaft, STOP even if you haven’t gotten to 45 seconds! If it goes further you will end up with dough inside the blade workings and it is a mess to clean.
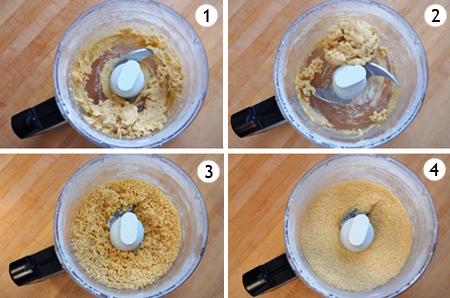 |
| This is what you should see after your four additions of flour, as described below. |
Add remaining flour in four additions, processing for about 20 seconds after each addition. Again, keep a watchful eye on the dough, especially in the first two additions; if it gets to the blade shaft, stop and make your next addition. After the first addition, it will still be gooey. The second addition will make a ball, which may then disintegrate again to goo. After the third, your pasta dough should resemble Israeli couscous. The fourth addition will make it look like wet sand or Moroccan couscous. You may look at it at this point and ask, “What did David make me do?” Trust me.
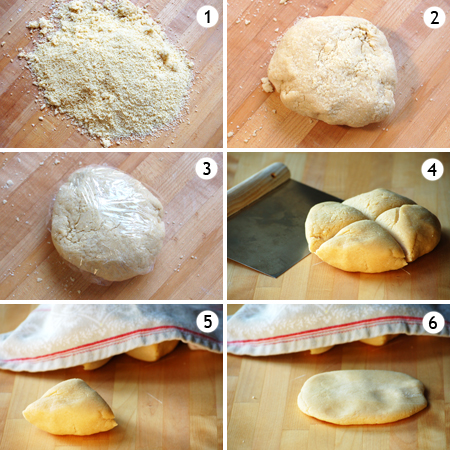
Turn the sand-like “dough” out onto the counter – wood, stone, or any other smooth surface. Pull it all together and squeeze it into a ball, wrap it in plastic and let sit on the counter for 30 minutes to let the gluten develop. Unwrap it, and cut it into four pieces. Cover three with a damp towel. Take the fourth and mold it onto a lozenge-shaped piece of dough about 1/2-inch thick. It shouldn’t be sticky; if it is, dust it with a little flour before using the machine.
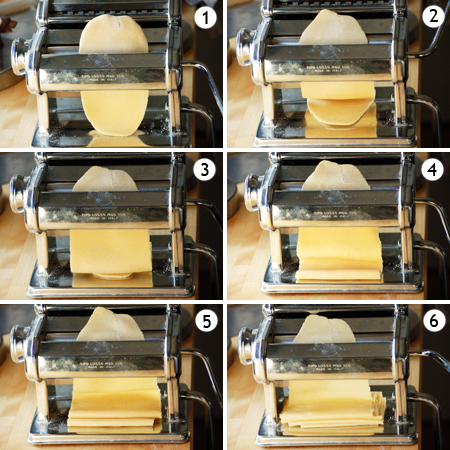
Start rolling it in the machine, beginning at the widest setting (No. 1). If it splits and seems shaggy at all, you can fold it in thirds and run it through again. Turn the machine to the second setting and roll it through once more. Continue one notch at a time until you have reached the 6th setting; you should have a piece of dough about 2 feet long.
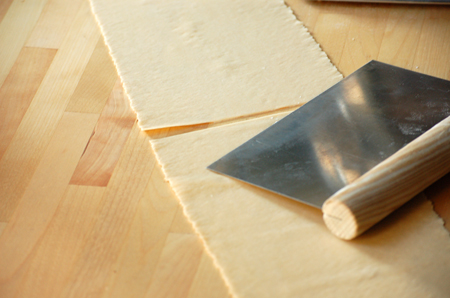
Cut this piece of dough in half using your dough scraper or a knife.
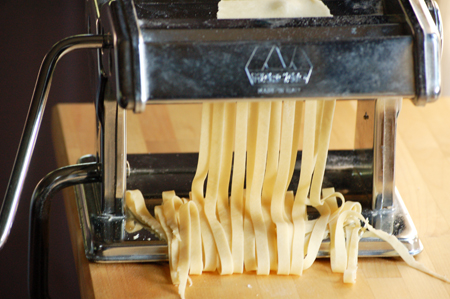
Then switch sections of the machine and run this through the tagliatelle setting.
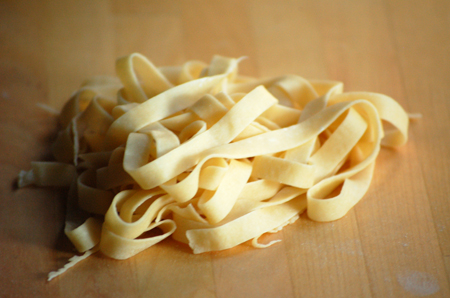
Dredge the strands in a bit of flour and make a small nest of dough; set aside while you repeat the process with the remaining dough.

You are now ready to tackle homemade pasta with minimal effort! The old-fashioned authentic way is great, too, but a bit more work and a lot messier. One night, we made a batch of each type to test which was better, and they had slightly different textures before cooking, but both came out the same when cooked.
That is it for my advice today – now, Buon appetito!
~ David

Developed and maintained by Inspiratech LLC.
Design by Themeshift.


Paula @ Vintage Kitchen
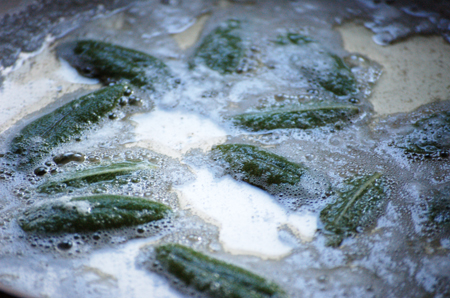
September 22, 2012 at 3:00 pmI have to undust (is that a word used in english?) my pasta machine, it´s been years since I used it. I find sage is a hard to use herb, but it goes extremely well with tomato sauce. My sage leaves tend to become bitter when I fry them, maybe I´m frying them too much…? Funny how so many ingredients turn bitter when exposed to too much heat (paprika, herbs, hazelnuts). Your pics are wonderful and simple pasta is always my first choice! Have a great weekend!
Cocoa & Lavender
September 22, 2012 at 3:11 pmPaula, I think we would "dust off" the pasta machine but I have to admit that "undust" makes much more sense! I never knew that about hazelnuts – good information when toasting them! One of my favorite little cicchetti (Italian tapas) are two sage leaves with a thin layer of anchovy past in the middle, battered and deep fried. Nothing like them. What kind of sage do you grow?
Paula @ Vintage Kitchen
September 22, 2012 at 8:32 pmOh, I don´t grow, I buy! I have a plan for my terrace but spring is already here, so I better get hopping!
Cocoa & Lavender
September 22, 2012 at 10:28 pmPaula – I love spring – all that renewal! Hope your herb garden comes to fruition! There is nothing like being able to cut your own herbs.
HollyGoLightly
September 23, 2012 at 12:13 pmI have loads of beautiful sage in our Mexican garden and I have a pasta maker so this will be a pleasant change from tortillas.
Cocoa & Lavender
September 23, 2012 at 2:26 pmHolly – I think a healthy balance between homemade pasta, tortillas and crêpes is a healthy attitude. I know you didn't mention crêpes, but I have been craving them lately so that were added to my list of now-preferred starches!
Karin
September 23, 2012 at 2:43 pmI LOVE making fresh pasta – it's like playdough for grown-ups, and you can actually eat it in the end! My favorite topping for home made pumpkin ravioli is burro e salvia, the perfect combo, and a sure sign of Fall in the northeast. Buon appetito!
Cocoa & Lavender
September 23, 2012 at 2:51 pmKarin – I, too, LOVE my pumpkin ravioli with burro e salvia – although I tend to like it with browned butter and the sage leaves crisp. So good! I hope you are having a good autumn so far, and I look forward to more Italian tales soon!
Anonymous
September 23, 2012 at 5:06 pmThis is such a wonderfully illustrated step-by-step instruction!
Many thanks for taking the time to share it!
Looking forward to days ahead when we will return to the kitchen with time to savor the love and labor!
Cocoa & Lavender
September 23, 2012 at 8:10 pmI am glad you liked the instructions! They would have been helpful the first time I made it. Sadly I cannot remember the provenance of this recipe to give the creator credit, but s/he (if they ever read this) might consider a step-by-step series, too! Hope you get back to your kitchen soon.
Susan
October 1, 2012 at 2:45 amHi David,
This is my second attempt at a comment–my first went into the black hole that my iPad seems to have for blogger! (I know you know what I mean!) Anyway, I am just getting back now to say that I think you should be selling pasta makers to go with this recipe–it looks so easy and, of course, delicious! I can't wait to have my own so I can create such wonderful meals myself. In the mean time, there is always Kittery's Pasta Man…oh goodness, I can't think of the real name of that really good pasta store!
Cocoa & Lavender
October 1, 2012 at 3:28 amSusan – it really is easy – and you did it with me! And, while Kevin (I think that is his name) at Terra Cotta Pasta does a good job, it will NOT hold a candle to your own homemade pasta! I think I need to talk to Santa and make sure he gets you a pasta machine for Christmas… Or your birthday!